Over the years, Evisions has taken on numerous projects and tackled many support tickets centered on banded reports. From building custom reports to advising on complex procedures to reproducing outdated or multi-sourced reports, a lot of time has been spent in the Banded Report Editor within Argos.
This time has shown us, and made us appreciate, that getting data into a DataBlock is one thing, but getting it out – in an intuitive, useful, and appealing format – is a completely different process.
Whether you’re putting a banded report together for the first time or just assembling a particularly complicated report, the design process can be quite a task. But take heart – you can save yourself a lot of time with a good plan of attack and some common best practices.
First, What is a Banded Report?
Before we jump into the nitty-gritty, let’s do a quick recap of what banded reports are and how they differ from the other report types available in Argos. Banded reports are fully formatted, which makes them especially useful for reports that call for special layouts, groupings, totals, subtotals, summaries, rich text, charts, graphs, images, etc. (Pretty much any visual element you can think of.)
The term “banded” was inspired by the fact that the reports themselves are organized into logical bands. Each band represents an area in the report that will hold a discrete collection of data. Banded reports are much more complex than CSV and Extract Reports, but they allow for complete control over the placement and layout out of the information.
Banded Report Tips
Now that we’ve got the definition down, here are some tips for easing the process of creating a banded report.
Know What You’re Making
Before starting, it’s helpful to have an example of what needs to be created. More than likely, you’re not building these reports for recreational purposes. People are requesting them. They have ideas about what they want and, unless you read minds, you’ll need to know what those are before you start.
Because banded reports have so many design options, it’s best if you can get a clear idea not only of the requester’s requirements in terms of data, but also in terms of how the finished report should look. (Check out our blog post on requirement documents here: Getting you Banner Black Belt (Lesson Two): Use Good Requirements Documents.)
The Right Band for the Job
Complex banded reports will often include a whole range of different band types. No matter how many you have, though, it’s best to start with the detail band, which is used to display the core set of data for your report. Every banded report will contain one and only one detail band. If you’re used to working with extract reports, which often have more than one detail band, this might take some getting used to.

So, work on building up your detail band first, and add additional bands from there. Look at what your detail band contains, and how it’s organized. Do you need group header and footer bands for the different groupings of data? Should there be information in the page header and footer bands, to make the report easier to navigate? Does your detail band need a child band beneath it, to supply additional information after each record? These questions will help you organize the structure of your Banded Report.
What’s in a Name
I can’t stress this point enough: a good naming convention is a lifesaver, both for yourself and for anyone who comes after you. This becomes particularly critical if your report has hidden bands or many layers of child bands. Evisions often uses the following naming convention in our banded reports:
<object> _<type>_<VariableName>_<OptionalDescription>
- Object would be the type of object you are naming (bands, labels, charts, expressions, datasets, etc.)
- Type would be the specific type of object you are naming. (For example, there are many types of bands: title, page header, detail, group header, etc.)
- Variable Name would describe the content that is contained within the object
- Optional Description is helpful for more complex reports. (For example, we use ‘HD’ to indicate when a band is hidden (i.e., its height is set to ‘0’))
Here’s an example of objects named according to this convention:
Example:
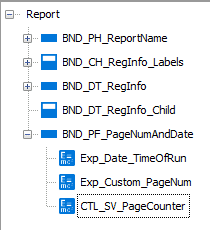
In the screenshot above we show the set-up for a detail band and one child band beneath it. Using our naming convention, each band would be titled the following way:
Detail Band:
bnd_DT_RegInfo
Child Band:
bnd DT _RegInfo_child
Also, if we have a system variable that counts our Page Number, we would name it: ‘CTL_SV_PageCounter’
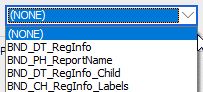
Note: we use ‘DT’ for the child bands to easily find and distinguish them in dropdown menus
On One Condition
If there is one advanced feature in the Banded Report Editor that is often deemed most useful, it is the conditional printing. Frequently, Argos users need to build a group of reports that are almost identical, except for a few differences in data or formatting. For situations like this, conditional printing is ideal. Using this feature, you can add all the bands needed for each report to a single banded report layout. Then, you can specify the conditions under which each band should be included. This will allow you to produce multiple reports from the same banded report layout. Using a technique like this can not only save time, but it will make your reports much more versatile and dynamic.
Conclusion
These are just a few of the best practices Evisions has come to rely on when building and troubleshooting banded reports for our clients. Next time you’re facing down a daunting banded report project, remember these tips. They can make your life a little – or a lot – easier!


Jerome,
Thank you for this article, it is very helpful.
Would you please tell me where I may find detail instructions about conditional printing you mention in the article above. This is something that sounds like a real time saver and worth learning. However, at my institution I cannot find any detailed instructions how to build this into a complex Banded Report. I am eager to hear from you as to where I may find detailed instructions how to do this.
Thank you,
Carol Green
Hi Carol,
Thank you for your comment. I’m glad you found this article helpful.
Conditional printing is something I use often and actually is something well documented in our in-product help pages. With Argos open you can use the upper menu and select “Help” or press F1 to automatically open the help pages. Once in the help pages you can search the term “Conditional Printing” in the upper right corner and you’ll come up with an example and instructions of how to do this.
If you hit a snag our folks on the HelpDesk are always glad to help. You can submit a ticket here: https://evisions.wpengine.com/Support/HelpDesk.aspx
I hope this information helps!
Jerome
Thank you, Jerome, for your reply. I will definitely follow your instructions and get busy with developing an example of this functionality to demonstrate to my colleagues.
You have been a great help!
Carol
I am also using conditional printing and have a lot of child bands in my report. However, not all my bands fit in within one page that I get when choosing banded report blank report subtype. This creates for me difficulty in updating the bands. I cannot see the last bands within the report.